APIs
https://jsonplaceholder.typicode.com/posts
[ll
{
"userId": 1,
"id": 1,
"title": "sunt aut facere repellat provident occaecati excepturi optio reprehenderit",
"body": "quia et suscipit\nsuscipit recusandae consequuntur expedita et cum\ "
},
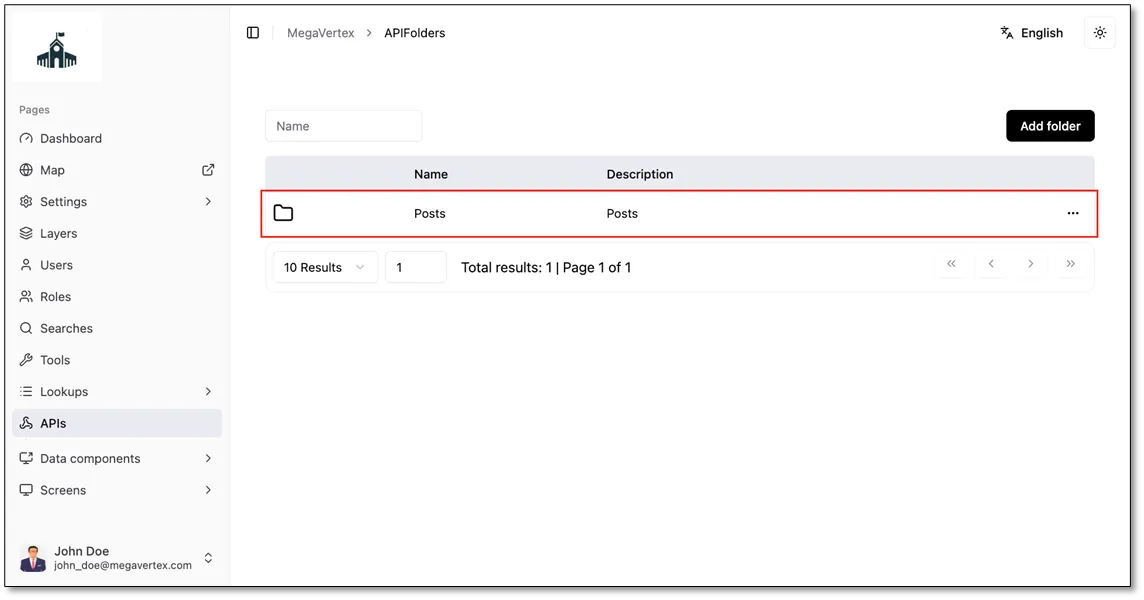
Double-click the folder we create to open it
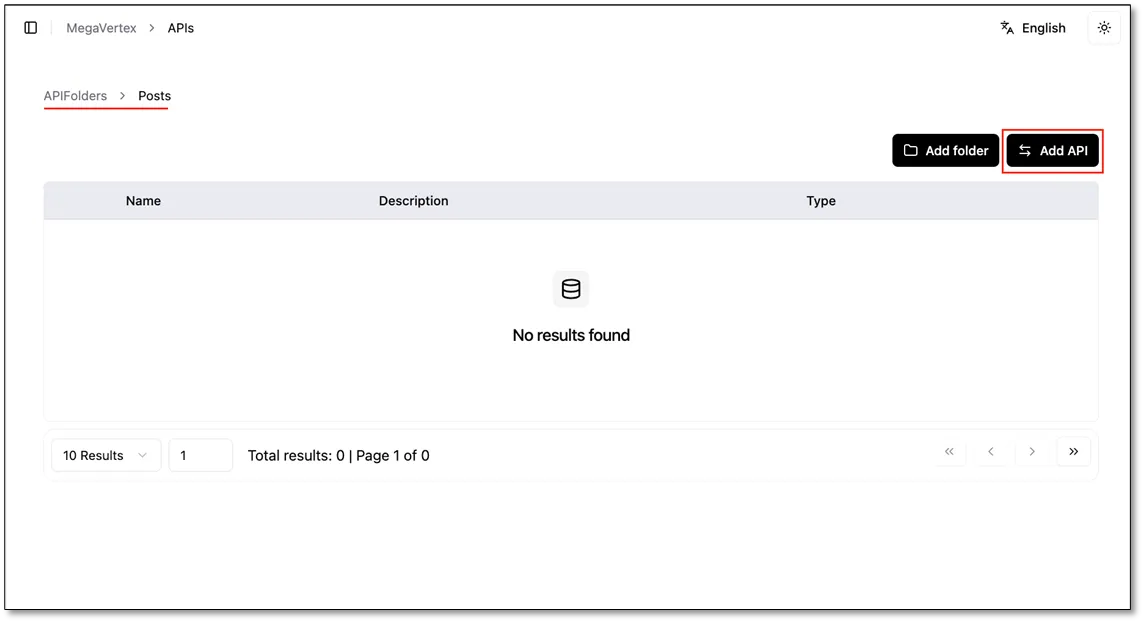
Inside the folder (in this example, Posts), click the Add API button.
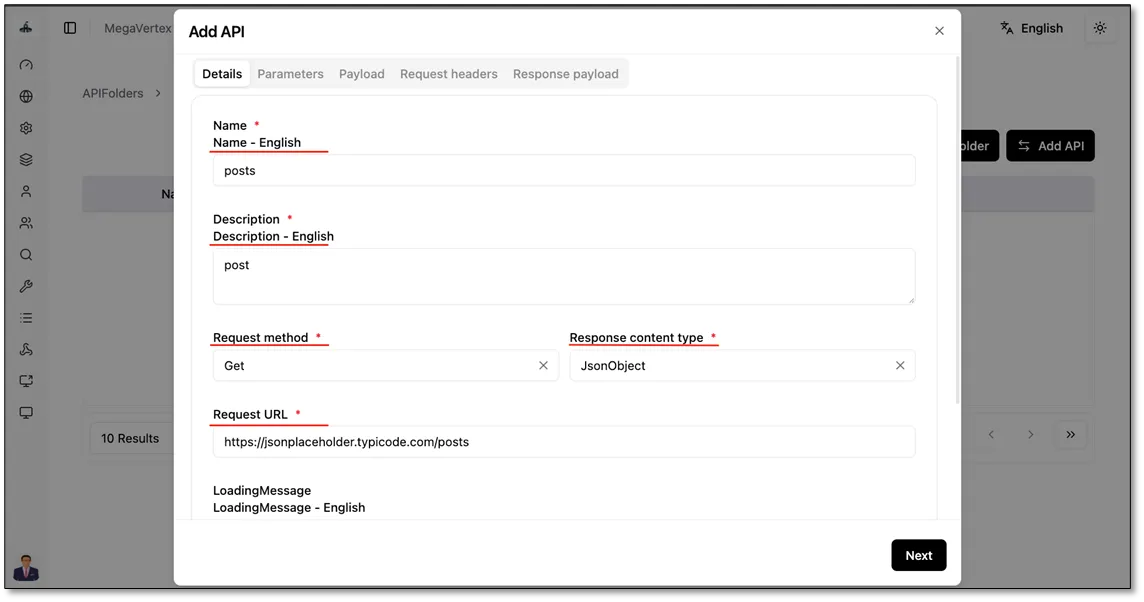
In the Details tab, fill in the following fields:
- Name: a name for the API.
- Description: a short description of what the API does.
- Request Method: the HTTP method the API uses (for example, GET or POST).
- Response Content Type: the format of the response (for example, JSON).
- Request URL: the full URL of the API endpoint.
- Loading Message: the message shown to users while the request is loading.
- Error Message: the message shown to users if the request fails.
Choosing a Request Method
The request method tells the system what you want to do with the data. Use GET to read or retrieve data, such as showing a list of posts. Use POST to create something new, such as adding a new post. Use PUT to update something that already exists, such as editing a post. Use DELETE to remove something, such as deleting a post. You usually don’t need to guess which one to use: the API provider or developer specifies the correct method for each URL in their API documentation, so check there or ask them if you’re not sure.
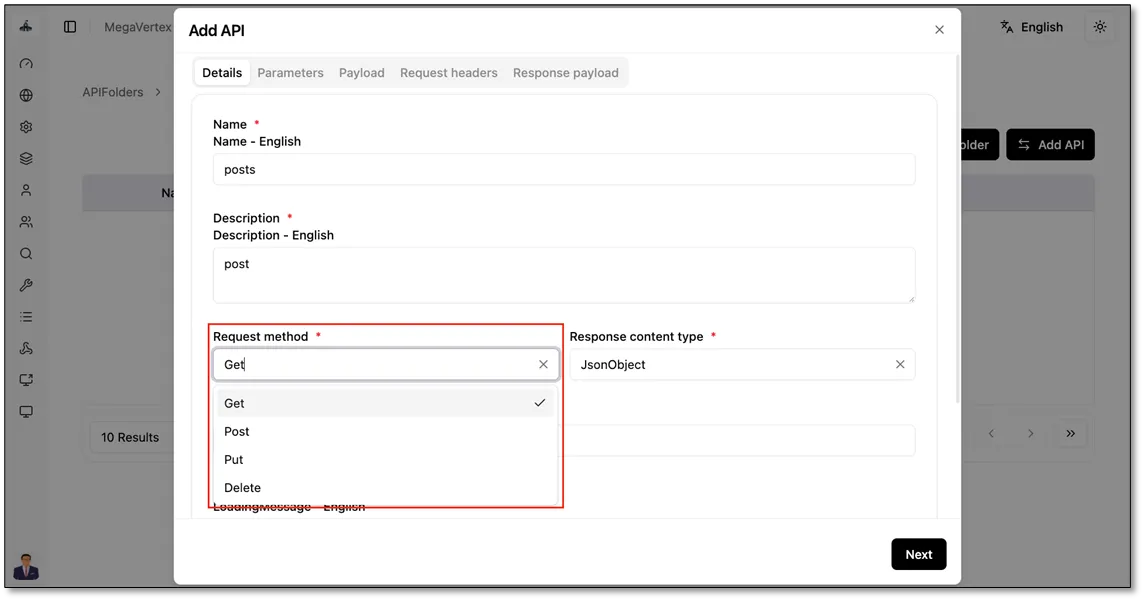
Choosing a Response Content Type
The response content type tells the system what kind of data the API sends back, so it can display it correctly. Choose JsonObject when the API returns a JSON. Choose ArrayOfObjects when it returns a list of items. Choose Array when it returns a simple list of values, such as a list of names or numbers. Choose Text when it returns plain text, Html when it returns a web page or formatted content, and File when it returns a file to download, such as a PDF or image. As with the request method, the API documentation usually shows what the response looks like, so check there or ask the API provider if you’re not sure.
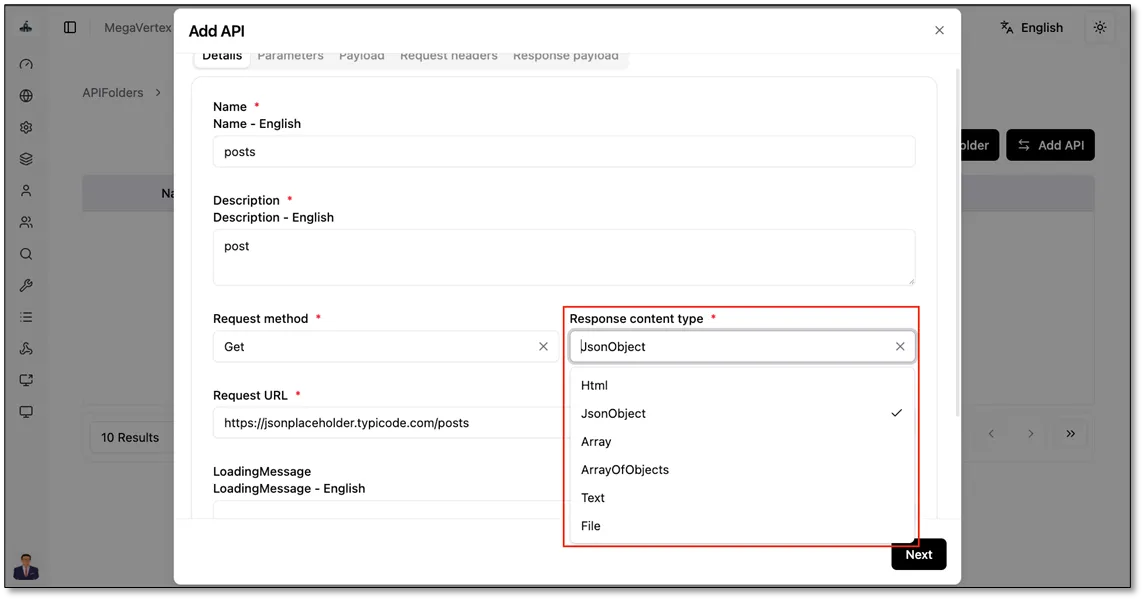
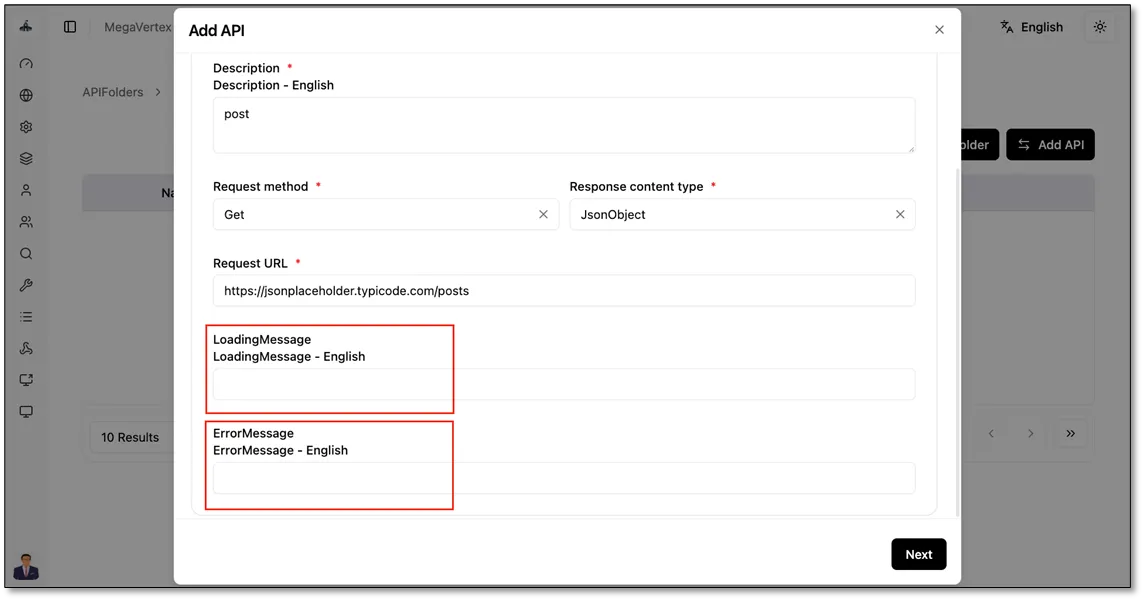
What is a parameter? A parameter is a value that changes part of the request URL. For example, to get a single post instead of all posts, the URL might be .../posts/{postId}, where {postId} is replaced with the number of the post you want, such as .../posts/5.
Open the Parameters tab. If the API needs parameters, add them to the Parameters field after the URL. You can write parameters in one of two ways, depending on what the API expects:
- Path parameters: write each one inside curly braces, separated by slashes, for example /{appid}/{featureid}.
- Query parameters: start with a question mark and separate them with &, for example ?appid&featureid.
Click + Parameters to define each parameter you added, then fill in:
Parameter: the parameter name exactly as you wrote it inside the curly braces (for example, example).
Name: a readable name for the parameter.
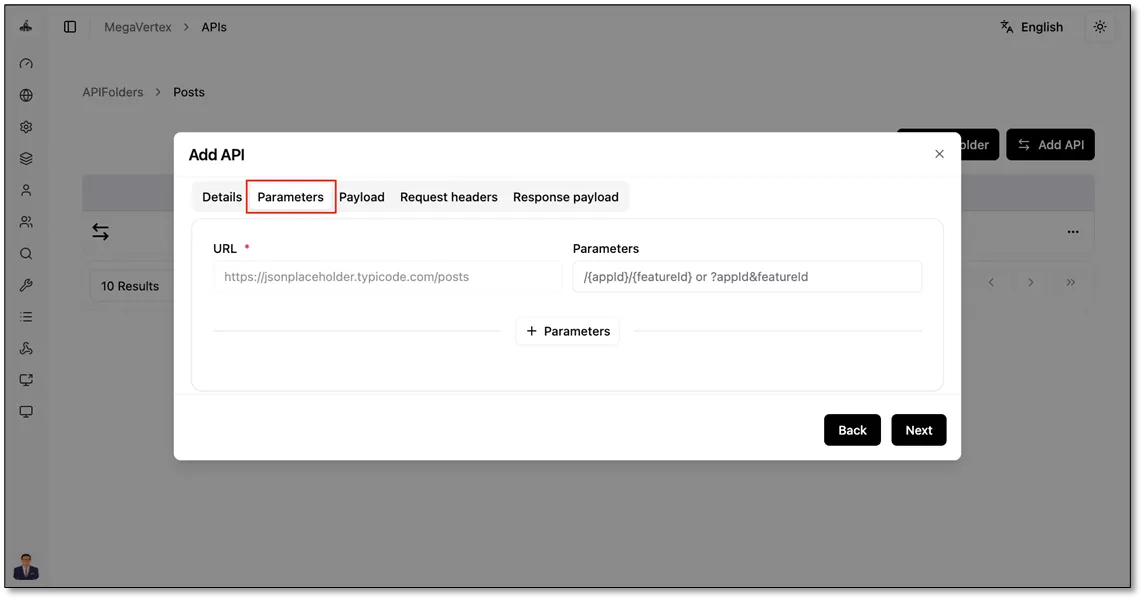
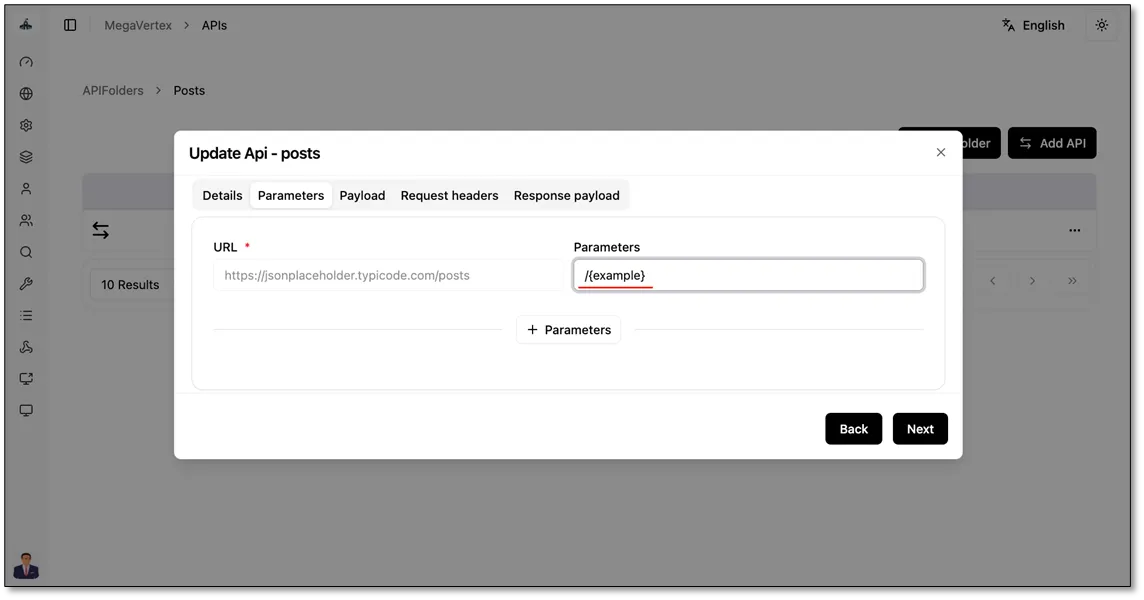
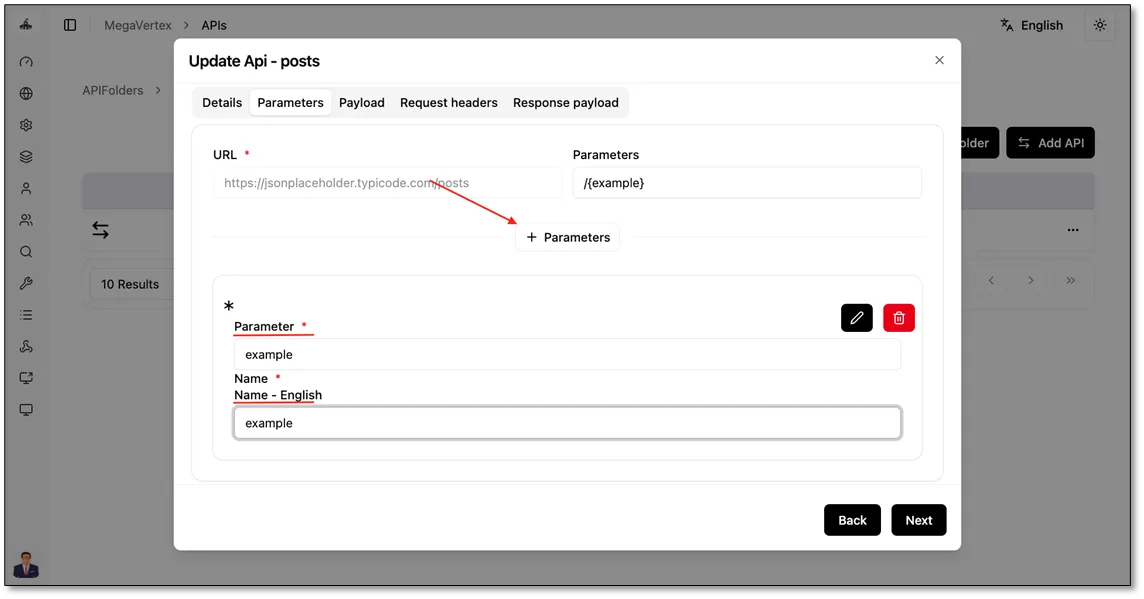
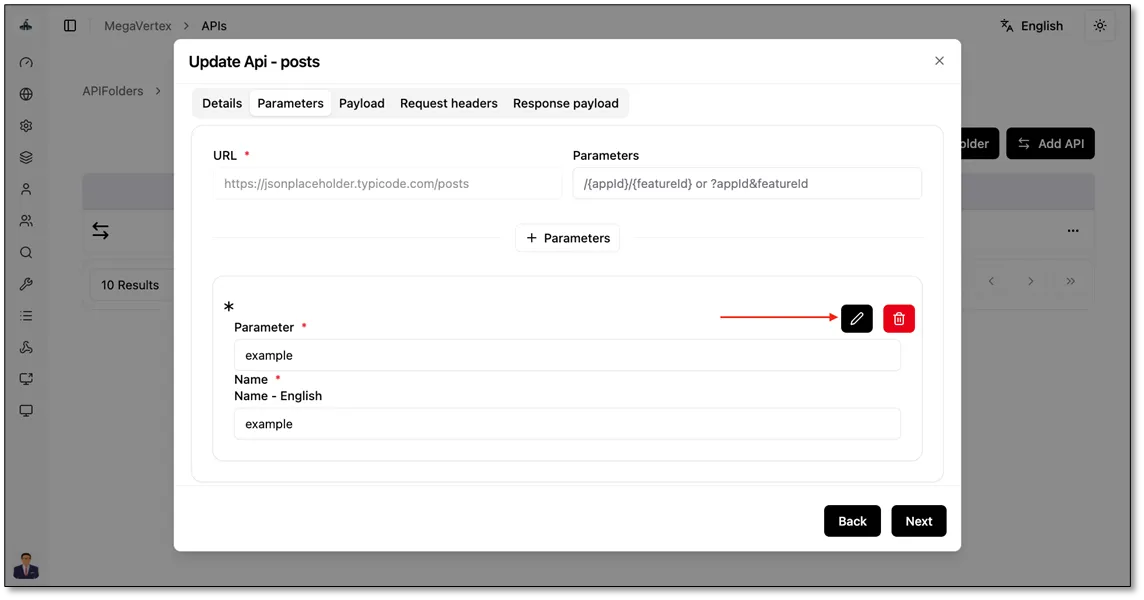
To configure a parameter in more detail, click the edit button (the black button with the pencil icon) next to it. This opens the Update API parameter field form, where you control how the parameter appears and behaves for users:
- Parameter and Name: the same values you entered when adding the parameter.
- Required: check this if the user must enter a value before the API can run.
- Enable code scanning by camera - mobile: check this to let mobile users fill in the value by scanning a code with their camera instead of typing it.
- Use as primary filter: makes this parameter the main filter users use to narrow down the results.
- HiddenInDataComponents: hides this parameter from users in the components that display the data.
- Default value: the value used automatically if the user doesn’t enter one.
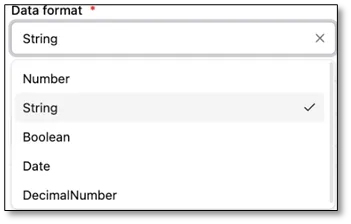
- Data format: the type of value the parameter accepts, such as String for text.
- Input component: the type of field the user fills in, such as NormalTextBox for a simple text box.
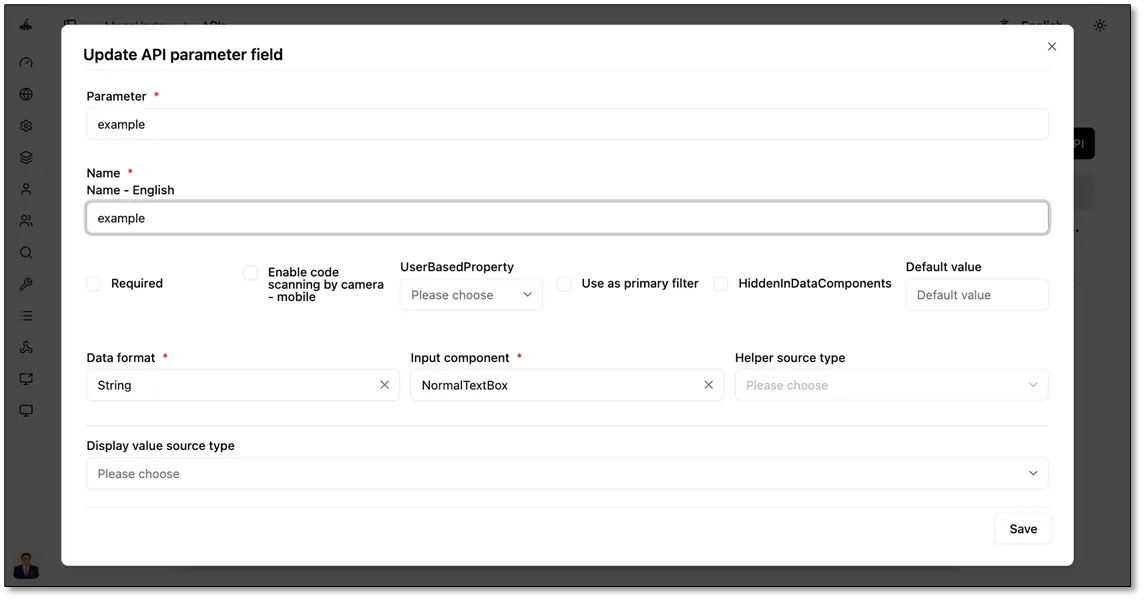
Choosing a Data Format
The data format tells the system what kind of value the parameter holds. Choose String for text, such as a name or code. Choose Number for whole numbers, such as an ID or a quantity (for example, 5). Choose DecimalNumber for numbers with a decimal point, such as a price or a measurement (for example, 12.5). Choose Boolean for yes/no values, which can only be true or false. Choose Date for dates, such as a start or end date.
Choosing an Input Component
The input component controls what the field looks like when the user fills in the parameter. Choose NormalTextBox for a simple one-line text box, suitable for short values. Choose TextArea for a larger box that fits longer text, such as notes or descriptions. Choose AutoCompleteText for a text box that suggests matching values as the user types. Choose DropDownList to let the user pick one value from a fixed list. Choose FileInput to let the user upload a file. Pick the component that best matches the data format.
Repeat this step for each parameter. If the API doesn’t need any parameters, leave this tab empty and click Next.
What is a payload? A payload is the data you send to the API along with the request. It is usually used with POST and PUT requests, when you create or update something. For example, to add a new post, the payload might include the post’s title and content. GET and DELETE requests usually don’t need a payload.
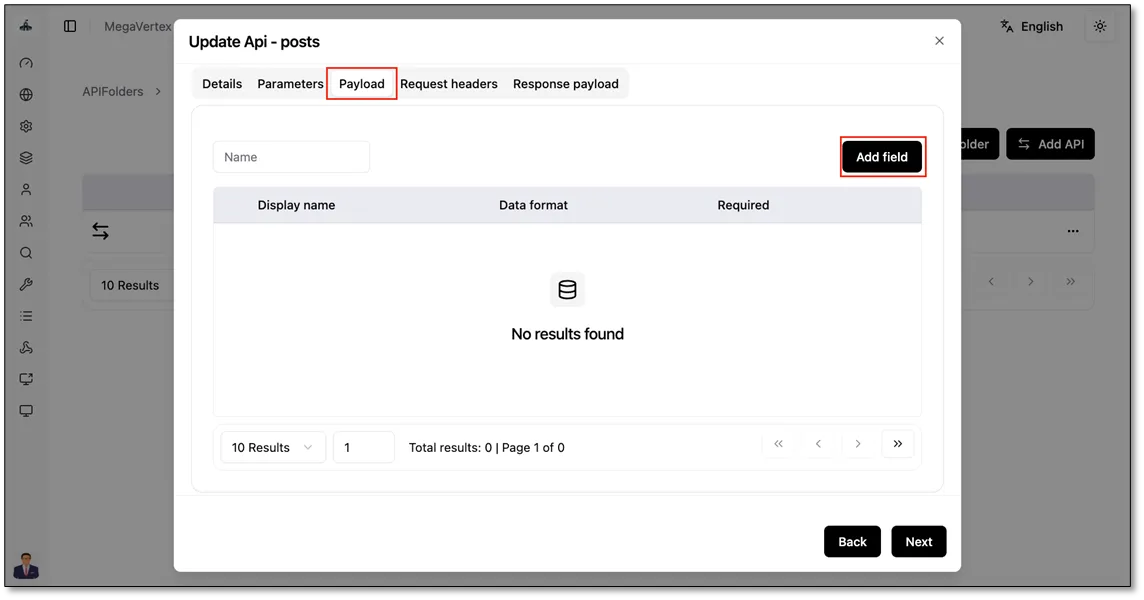
Open the Payload tab. If the API needs data sent with the request, click Add field to add each field.
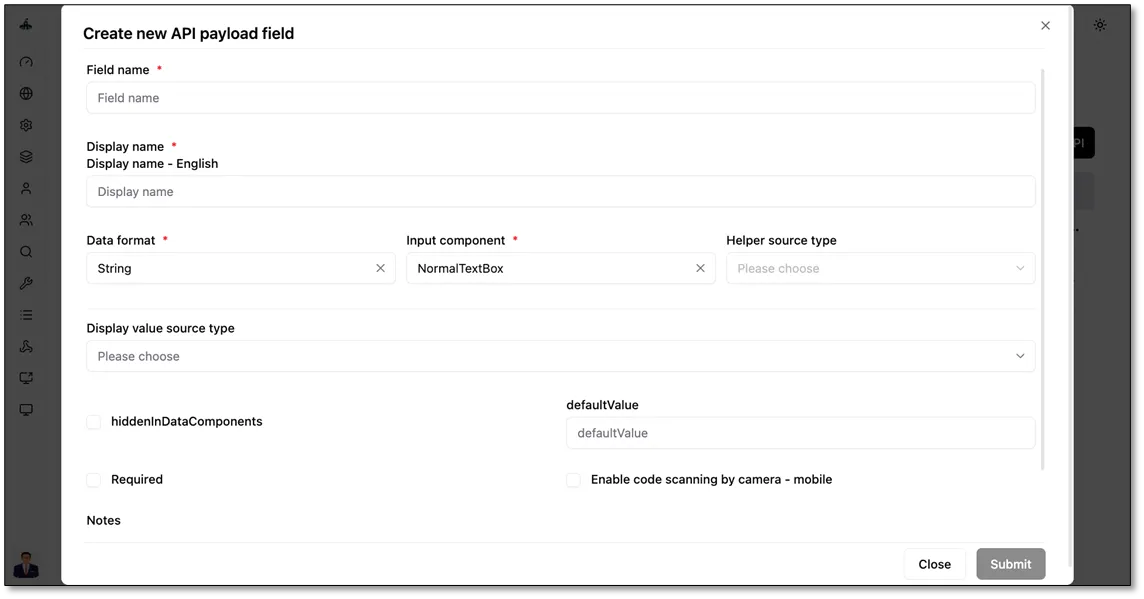
This opens the Create new API payload field form, where you fill in:
- Field name: the field name exactly as the API expects it (for example, title).
- Display name: a readable name for the field that users will see.
- Data format: the type of value the field holds, such as String for text. See Choosing a Data Format above.
- Input component: the type of field the user fills in, such as NormalTextBox. See Choosing an Input Component above.
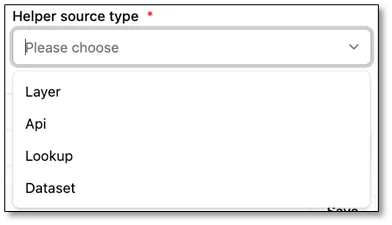
- Helper source type: the source of suggested values that help the user fill in the field.
- HiddenInDataComponents: hides this field from users in the components that display the data.
- Default value: the value used automatically if the user doesn’t enter one.
- Required: check this if the user must enter a value before the API can run.
- Enable code scanning by camera - mobile: check this to let mobile users fill in the value by scanning a code with their camera instead of typing it.
- Notes: any extra information about the field, for your own reference.
Click Submit to add the field, and repeat this step for each one. If the API doesn’t need a payload, leave this tab empty and click Next.
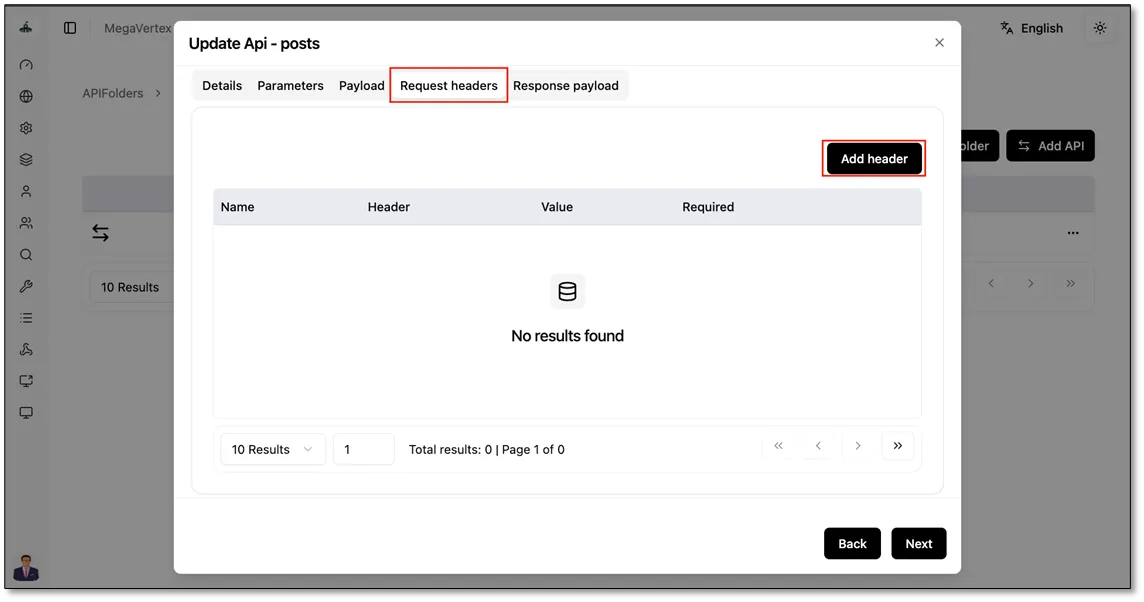
What is a request header? A request header is extra information sent along with the request that tells the API how to handle it, without changing the request itself. For example, a language header tells the API to send the response in Arabic or English, and a user header tells the API who is making the request and what they’re allowed to see. The API documentation lists which headers are needed.
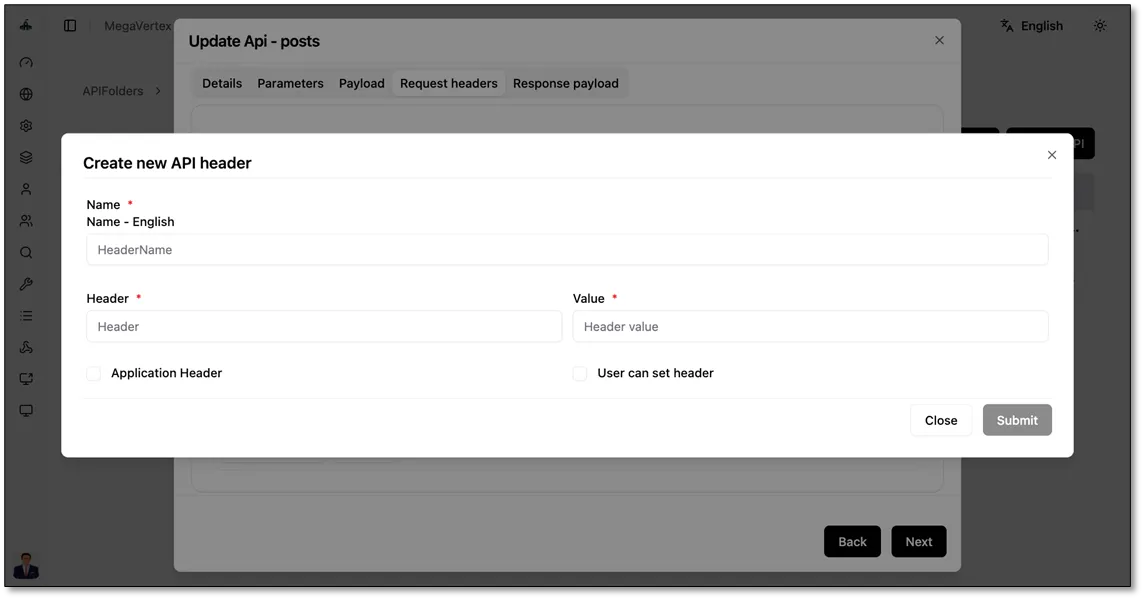
Open the Request headers tab. If the API needs extra information sent with each request, click Add header. This opens the Create new API header form, where you fill in:
- Name: a readable name for the header.
- Header: the header name exactly as the API expects it (for example, Accept-Language).
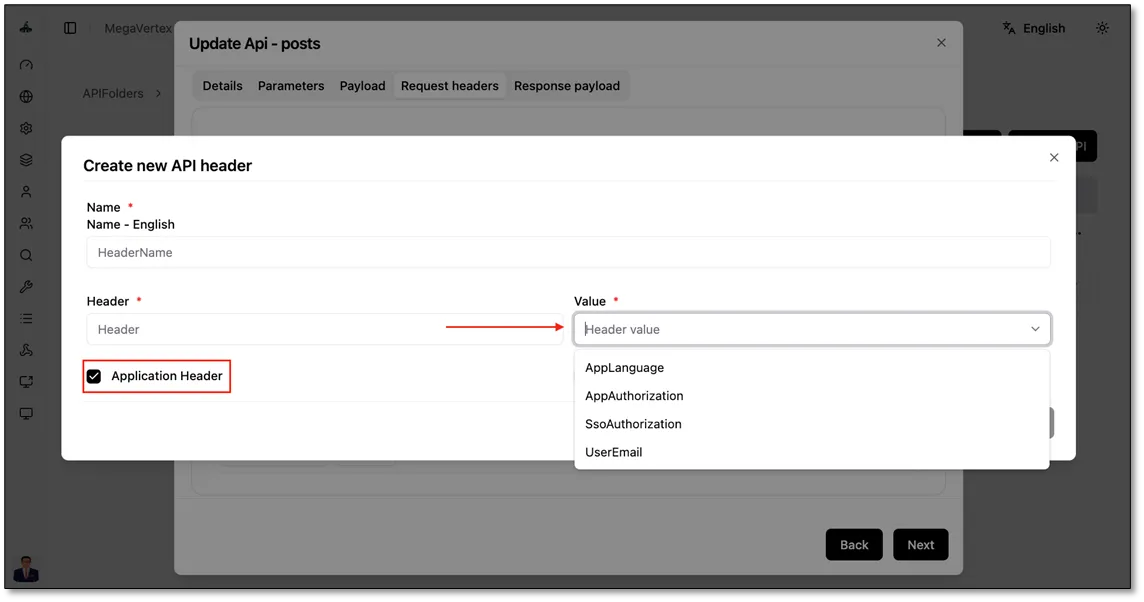
- Value: the value sent with the header. You can enter a fixed value yourself, or let the app fill it in automatically (see Application Header below).
- Application Header: check this to have the app fill in the value automatically from the current session. When checked, the Value field becomes a list where you choose what to send:
- AppLanguage: the language the user is currently using in the app.
- AppAuthorization: the logged-in user’s access token in the app.
- SsoAuthorization: the user’s access token from single sign-on (SSO).
- UserEmail: the email of the logged-in user.
- User can set header: check this to let users enter or change the header value themselves.
Click Submit to add the header, and repeat this step for each one. All added headers appear in the table. If the API doesn’t need any headers, leave this tab empty and click Next.
What is a response object? When the API runs, it sends back data, and each piece of that data is a field. For example, the posts API used in this guide returns posts with fields such as id (Number), userId (Number), title (String), and body (String). You only need to add the fields you want to show or use in the app. To find the field names and their types, check the API documentation or look at an example response from the API.
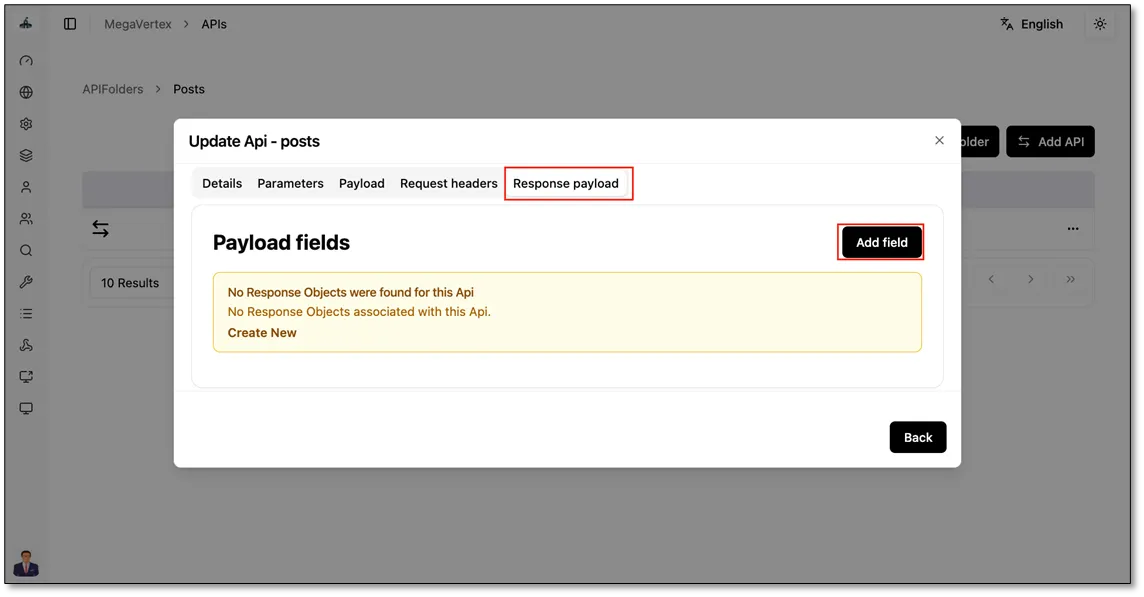
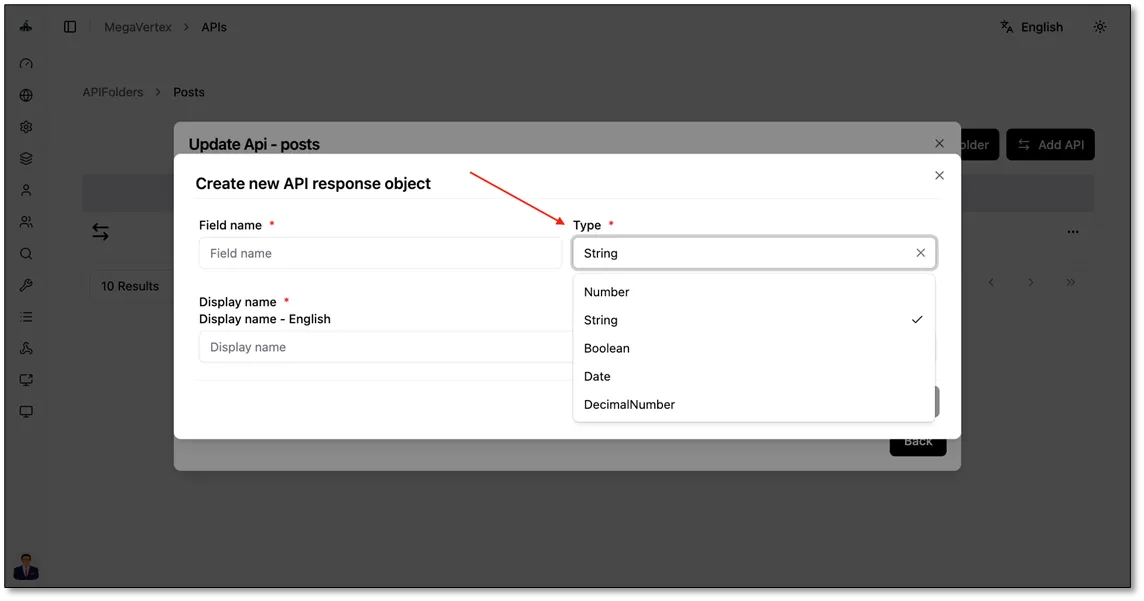
Open the Response payload tab. Here you define the fields the API sends back, so the app knows how to read and display them. Click Add field (or Create New if no fields have been added yet). This opens the Create new API response object form, where you fill in:
- Field name: the field name exactly as it appears in the API response (for example, title).
- Type: the type of value the field holds:
- String for text.
- Number for whole numbers.
- DecimalNumber for numbers with a decimal point.
- Boolean for yes/no values.
- Date for dates.
- Object for a field that contains a group of other fields, such as an address field that includes a city and a street.
- Array for a field that contains a list of values, such as a tags field that holds several tags.
- Display name: a readable name for the field that users will see.
Repeat this step for each field you want to use from the response.